When I think marshmallows, I think JetPuff. When I think JetPuff, I think of s'mores. When I think s'mores, I remember a time when I was five and decided to roast a bunch of marshmallows at once and put them on the bench beside me, so I would not have to keep stopping in between s'mores to make some more. Needless to say, the idea ended up going horribly awry. I ended up with a butt full of marshmallows, instead of a belly full (I accidentally sat on them). Back to marshmallows, yes marshmallows...I have always had an affinity for those little. white puffs of spongy goodness. There has always been something inexplicably strange, yet satisfying, to put one in your mouth; to feel it melt and squish across your tongue. Although, I was never fond of the powdery feeling you would feel in the inside of your cheeks when you had had too many.
The whole making my own marshmallows came about when, couple of days ago, I tried my hand at making whoopie pies for the first time. I had never had one before, but I wanted to try something different. Something that my kitchen has never seen before, or my family for that matter. Although I love cupcakes and they will always have a special place in my heart, kitchen, and stomach, I felt it was time for a change. Anyways, I know that whoopie pies usually have a marshmallow fluff based frosting, however, my whoopie pies were marshmallow fluff-free. Partially because that is not a usual staple in our pantries and partially because I had decided to make them spur-of-the-moment. I ended up using a "no-cook" version of 7 Minute Frosting (it is really a great, fluffy frosting I will have to put up one day). Everyone in the house loved the whoopie pies and suddenly I was thinking of creating new whoopie pie flavor combinations, which made me start thinking of marshmallows. Although 7 Minute Frosting tastes great sandwiched in a whoopie pie, I wanted a little more substance.
Sure, I could just go out and buy some marshmallow fluff, but I do not do store bought. Ok...sometimes I do do store bought, but I try to avoid if I can make it. I have seen many food magazines and blogs try their hand at making marshmallows, but I tried to avoid making them at all costs. I am not sure why. Perhaps it was reading the fact that a candy thermometer is often required, I know how to use one, but I am not a fan. Perhaps it was reading stories about marshmallow making going horribly awry. Either way, I have voiced my avoidance of making my own marshmallows to my husband on several occasions, the most recent being last week. And then this morning I announced to my husband, "Today, I am making marshmallows!"
I smiled and waited for him to respond. And he did.
"What happened to you saying you would NEVER make your own marshmallows because it was too messy and too much trouble?"
To which I responded like I always do when I change my mind, which is quite often. I just smiled my sheepish smile.
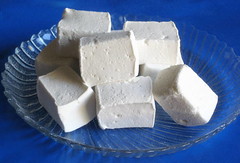
And do you know what? I am so unbelievably happy that I changed my mind. The marshmallows were not hard to make and they came out amazing! Everyone who has ever made, or tried a homemade, marshmallow is right, once you have had a REAL marshmallow, you never will go back to store bought marshmallows again.
JetPuff? JetPuff who? I am already dreaming up new flavors to try...
HOMEMADE VANILLA MARSHMALLOW RECIPE
(Makes about 90 (2 x 2) marshmallows. Recipe halves quite nicely.)
(Makes about 90 (2 x 2) marshmallows. Recipe halves quite nicely.)
- 4 tbsp gelatin (equals about 4 packets)
- 3/4 cup water
- 1 tbsp vanilla
- 3 cups sugar
- 1 1/4 cup light corn syrup
- 3/4 cup water
- 1/2 tsp salt
- powdered sugar and rice flour (cornstarch may be substituted)
- Line an 11 x 15 baking pan with parchment or wax paper. If you do not have this size baking pan, you could use a 9 x 13 pan and a loaf pan for the excess. Coat the paper with vegetable oil or non-stick spray. At this time, also fit your mixer with the whisk attachment.
- Mix the vanilla extract and 3/4 cup of water in the bowl of a stand mixer and sprinkle the gelatin over to soften (also called blooming) for about 10 minutes.
- Put the sugar, corn syrup, remaining 3/4 cup water and salt in a heavy saucepan. Cover and bring to a boil. Once it comes to a boil, uncover and continue boiling until it reaches the soft-ball stage (234-240 F). I said before that I do not like using candy thermometers, so soft-ball stage would mean that if you dripped some of the hot sugar into ice cold water, it would form a ball. However, if you were to pick up the ball of sugar from the water it would still be malleable. This is how I tested when my sugar was done. Cooking sugar can be a temperamental process and temperatures can change quickly; so watch your sugar carefully. Also, remember this is hot sugar so please, BE CAREFUL.
- With the mixer at medium speed, pour all of the hot syrup slowly down the side of the bowl. Use great care as the mixture is very liquid and hot at this point and some may splash out of the bowl ; use a splash guard if you have one. After the mixture has started to come together, turn up the speed to high and whip until the mixture is very fluffy and stiff (about 8-10 minutes). You will notice at this point your mixture will grow quite a bit. Mine almost came to the top of my KitchenAid mixer's bowl.
- Pour mixture into the prepared pan and smooth with an oiled offset spatula so that it is level with the top of the rim (it should not completely fill the pan). Allow the mixture to sit, uncovered at room temperature until set and not that sticky. Most recipes will say 10-12 hours, even overnight. I found mine set in about 4 hours. However, it really depends on how thickly you poured your marshmallow and the weather. If it is really hot, you may find it difficult to make your marshmallow set.
- When the marshmallow is set, mix equal parts powdered sugar and rice flour and sift generously over the rested marshmallow slab. A lot of recipes I found use just powedered sugar, I think that it would be far too sweet and deter from the smooth, creamy, light flavor. I had read somewhere that some chefs use rice flour or potato starch since both are flavorless and coat the marshmallows without clumping.
- After you have liberally sifted the powder mixture onto the marshmallow slab, turn it out onto a cutting board, or counter, peel off the paper and dust with more powder mixture. Slice with an oiled chef's knife, oiled cookie cutters, or clean, oiled kitchen scissors. Dip all cut edges in powder mixture and shake off excess. Marshmallows will keep about three weeks at room temp in an air-tight container. If they last that long...


No comments:
Post a Comment