Monday, October 5, 2009

Having a Ball with Sopa de Albondigas "Mexican Meatball Soup"

Today, was a good day. I do not find this very surprising because most days in my life are usually quite good, but today was not just any day in my life. No. I have a new goal I have set for myself and I hope to reach it with the support of my friends, family, and willpower. About the end of last week I decided that since I had met the current challenge I had set forth for myself (running each morning and hitting the gym in the afternoon); it was time to set a new goal. I have decided that I want to compete in a figure competition and become a figure model. This is going to take a lot more dedication and focus than most of my goals in the past. This is a complete and utter change of not only of my focus and training, but of my life and diet. Today was the day I began the change of a lifetime, as I plan for it to be a continued part of life even when I meet my goal.

I am not saying that it was necessary for me to go on a diet, no. I am just saying that today I revamped the way I eat and it has already begun to take its effects. Most people seem to associate diets with counting calories or minimal amounts of food, this is not what a diet is. Now, yes. However, if you look at the true definition of a diet, as per the Merriam-Webster dictionary it merely means "food and drink regularly provided or consumed." These days, there is a stigma about the word. While, yes, the nation's waistbands seem to be increasing, it is not really about limiting one's intake as it is eating the right foods at the right time and getting some physical activity in. I am not going to use my blog as a soapbox as I am far from the poster child for healthiness at all times. I have been guilty of: eating dessert right before bed, eating strictly carbs the entire day, skipping multiple meals in a day, sweets before meals...you get the point...

My husband is very much into working out and eating on a regular basis. Before him, I was pretty much just focused on being thin, rather than being healthy. He has changed my whole outlook on what eating can do for my body, meaning it is not just a means to satiate hunger. He is actually the one who suggested I try competing. I never thought that I had even the slightest potential to be successful in something like figure modeling, but he did. His faith in what I can be has given me the strength to try. With his help, I have an eating plan where I can still enjoy food, but optimize what my body does with it. The biggest changes he made were how many times a day I eat and how I combine the foods when I eat. The first one has been the biggest challenge because as much as I love to cook, I am not always the best about eating enough. He has set up a plan where I have to eat five times a day, but can eat up to seven if I want. The other change was carbs cannot be eaten in combination with proteins (with slight exceptions) and carbs cannot be eaten with fats. While I still consider the first change to be the most difficult to adapt to, cooking meals that all of us can enjoy as a family will also be a bit of challenge. I found this out today when I wanted to make my albondigas soup for dinner. The only problem was I had neglected to notice that rice was mixed with the ground meat in the meatballs, plus there was added starch in the form of potatoes in my recipe. Not wanting to make two separate pots of soup I made some slight adjustments and came up with something delicious. The best part is that it fits my dietary needs, as long as I avoided the potatoes, and my boys could eat it too without being put on my new eating plan. It was a win-win situation.
Sopa de Albondigas
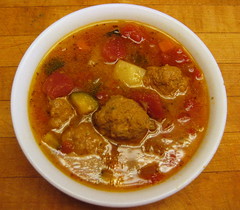
I hope it is something that you can share with your family as well.

SOPA DE ALBONDIGAS "MEXICAN MEATBALL SOUP" RECIPE

(Makes about 6-8 generous servings)
  • 2 lbs ground turkey
  • 1/4 -1/2 cup bread crumbs
  • 4 tbsp freshly grated onion
  • 1 1/2 tsp ground cumin
  • 2 tsp Mexican oregano
  • 1 tsp salt
  • 2 eggs
  • 2 cloves garlic, minced
  • 1 1/2 cups carrots, diced
  • 1 1/4 cups zucchini, diced
  • 3/4 cup celery, diced
  • 1 cup onions, diced
  • 3 small, or 2 medium, potatoes, cubed
  • 1/2 cup salsa
  • 2 cloves garlic, minced
  • 1 tbsp chili powder
  • 1/2 tsp salt
  • 1/2 tsp ground cumin
  • 1 tsp Mexican oregano
  • 2 (14 oz) cans low sodium chicken broth
  • 1 (14.5 oz) can diced tomatoes, undrained
  • 1 - 1 1/2 cups water (optional, this soup is pretty thick and hearty)
  1. Combine the first eight ingredients together in a large bowl. Mix well and shape tukey mixture into 1 1/2 - 2 inch meatballs.

  2. Put the remaining ingredients, except potatoes, to a slow cooker, stirring just to combine. Add the meatballs to the soup mixture and cook on high for 4-5 hours.

  3. Add the potatoes to the soup and cook for another 1-2 hours, or until potatoes are tender.

Friday, October 2, 2009

Yum Yum...Cinnamon Buns...err...Rolls?

I have always wondered what the difference between a cinnamon bun and a cinnamon roll is because, to me, they always seemed to be used interchangeably. Upon investigation I found that although they are pretty much one and the same, the main difference seems to be that one has icing and the other does not. Icing, or not, they are delicious and they are the perfect treat for your family, or yourself, on the weekend.
Freshly glazed homemade cinnamon rolls
Also, the plus side to my cinnamon rolls is they are a slight deviation from the usual butter and whole milk laden ones, but equally delicious. It kind of justifies having more than one, right?

CINNAMON BUNS OR ROLLS (you decide) RECIPE

(Makes 18 to 20 rolls)

DOUGH:
  • 1 cup skim milk
  • 3 tbsp vegetable oil
  • 3 1/2 cups (or more) unbleached all purpose flour, divided
  • 1/2 cup sugar
  • 1 large egg
  • 1 package rapid-rise yeast (about 2 1/4 tsp)
  • 1 tsp salt
  • Nonstick vegetable oil spray
  1. Combine milk and oil in glass measuring cup. Microwave on high until mixture is just warmed to 120°F to 130°F, 30 to 45 seconds.

  2. Pour into bowl of stand mixer fitted with paddle attachment. Add 1 cup flour, sugar, egg, yeast, and salt. Beat on low speed 3 minutes, stopping occasionally to scrape down sides of bowl.

  3. Add 21/2 cups flour. Beat on low until flour is absorbed and dough is sticky, scraping down sides of bowl. If dough is very sticky, add more flour by tablespoonfuls until dough begins to form ball and pulls away from sides of bowl.

  4. Turn dough out onto lightly floured work surface. Knead until smooth and elastic, adding more flour if sticky. If you are using a mixer, just trade your paddle attachment for a dough hook. Knead the dough for about 8 minutes. Form into ball.

  5. Lightly oil large bowl with nonstick spray. Transfer dough to bowl, turning to coat. Cover bowl with plastic wrap, then kitchen towel. Let dough rise in warm draft-free area until doubled in volume, about 2 hours.

FILLING:
  • 3/4 cup (packed) golden brown sugar
  • 2 tbsp ground cinnamon
  • 1/4 cup vegetable oil
  1. Mix brown sugar and cinnamon in medium bowl.

  2. Punch down dough. Transfer to floured work surface. Roll out to 15×11-inch rectangle. Spread butter over dough, leaving 1/2-inch border. Sprinkle cinnamon sugar evenly over butter. Starting at 1 long side, roll dough into log, pinching gently to keep it rolled up. With seam side down, cut dough crosswise with thin sharp knife into 18 equal slices (each about 1/2 to 3/4 inch wide). You could make them bigger, but remember to choose the pan to bake them in accordingly, they will rise quite a bit.

  3. Spray either 9-inch square glass baking dishes, or a 8 x 11 baking pan with nonstick spray. Divide rolls between baking dishes, arranging cut side up (there should be almost no space between rolls). Cover baking dishes with plastic wrap, then kitchen towel. Let dough rise in warm draft-free area until almost doubled in volume, 40 to 45 minutes.

  4. Position rack in center of oven and preheat to 375°F. Bake rolls until tops are golden, about 20 minutes.

The process of cinnamon roll making
ICING:
  • 1 cup powdered sugar
  • 1 tbsp + 1 tsp milk
  • 1 tbsp rum (optional)
  • 1/2 teaspoon vanilla extract
  1. Combine powdered sugar, milk, rum (if using), and vanilla in a bowl. Using a whisk or fork, beat until smooth.
  2. Drizzle glaze on rolls. You could use this glaze sparingly, or make a double batch and really coat them. Serve the cinnamon rolls warm or at room temperature.

Going Greek: Adventures in Homemade Pita Bread

I have spoken before of mishaps happening, on occasion, in our kitchen. Sometimes it can be painful. Sometimes it can be inedible. Sometimes it turns out to be pleasantly tasty.

Lately, here in sunny San Diego, it has definitely begun to feel like Fall. Living so close to the water, like we do here in Point Loma, this means that the nights and mornings have been filled with drizzle and heavy fog. This weather always makes me want to warm our home. My latest way to do this, making bread. Last year I taught myself how to make several different types of bread including: sourdough, challah, brown bread, and regular white bread. Yesterday I wrote about making sweet dough bread in the form of teddy bears. Today was all about the pita.

Our family loves pita bread. I have served it alongside my homemade tandori chicken. We have scooped up different flavors of hummus bought from the local farmer's market. My son likes it when his sandwiches are made with them. It had never occurred to me to make my own. Until today. I would like to say that, like most recipes I have encountered, I conquered it in my first attempt. However, this was not so. My dough rose perfectly and handled easily. I heated my pizza stone and oven to the temperature asked. I put my flattened dough on the heated stone and waited for them to rise. Though they bubbled, they never rose. I ended up with a lovely batch of delicious, soft flat bread.
My first attempt at making pita
I have nothing against flat bread. It is just...I wanted to make pita.

I could not figure out what had went wrong. I had followed the recipe perfectly. I had let the dough proof and rest its requisite amount of time. I had rolled my dough out thinly enough. I had let my pizza stone get nice and hot. I was stumped. Not being one to take a kitchen snafu sitting down, I went online to research what I had done wrong. After checking on numerous websites and blogs of those who had also attempted making homemade pita and while the recipes were all the same, I noticed that they had baked their pita at a higher temperature. Perhaps that had been my folly all along, the temperature was not hot enough. I decided to test this idea and set out making another batch of pita dough. I was right, the temperature in my recipe had not been hot enough. I found that raising the temperature 75F degrees was enough to make my little pitas puff up beautifully.
Pita in the oven

HOMEMADE PITA BREAD

(Makes about 8 pita)
  • 3 cups flour (white or whole wheat, or a mix. I used unbleached white the first time and white/wheat the second time)
  • 1 1/2 tsp salt
  • 1 tbsp agave nectar (sugar could be substituted)
  • 1 packet yeast (2 1/4 tsp)
  • 1 1/4 to 1 1/2 cups water, warmed (warm, but not uncomfortable to put your finger in it)
  • 2 tbsp olive or vegetable oil
  1. In the bowl of a mixer, if you do not have one a medium sized bowl would do, with a dough hook attachment, mix the yeast in with the flour and salt.
  2. In a measuring cup mix together 1 1/4 cup warm water, olive oil, and agave syrup. Add this to the flour/yeast mixture with the mixer on low.

  3. All of the ingredients should form a ball. If some of the flour does not stick together with the rest of the dough, add more water (I had to add an extra 1/4 cup).

  4. Once all of the ingredients form a ball, place the ball on a work surface, such as a cutting board, and knead the dough for approximately 10 minutes (lets face it, most of us would probably get tired before 10 minutes were up, so just knead until your hands get tired). If you are using an electric mixer, mix it at low speed for 10 minutes.

  5. When you are done kneading the dough, place it in a bowl that has been lightly coated with oil. Form a ball out of the dough and place it into the bowl, rolling the ball of dough around in the bowl so that it has a light coat of oil on all sides. Cover the bowl with plastic wrap or a damp kitchen towel and set aside to rise until it has doubled in size, approximately 90 minutes.

  6. When it has doubled in size, punch the dough down to release some of the trapped gases and divide it into 8 pieces. Roll each piece into a ball, cover the balls with a damp kitchen towel, and let them rest for 20 minutes.Pita dough\

  7. While the dough is resting, preheat the oven to 475F degrees. If you have a pizza stone, put it in the oven to preheat as well. If you do not have a baking stone, turn a cookie sheet upside down and place it on the middle rack of the oven while you are preheating the oven. This will be the surface on which you bake your pitas.

  8. After the dough has relaxed for 20 minutes, spread a light coating of flour on a work surface and place one of the balls of dough there. Sprinkle a little bit of flour on top of the dough and use a rolling pin or your hands to stretch and flatten the dough. You should be able to roll it out to between 1/8 and 1/4 inch thick. If the dough does not stretch sufficiently you can cover it with the damp towel and let it rest 5 to 10 minutes before trying again.

  9. Open the oven and place as many pitas as you can fit on the hot baking surface. They should be baked through and puffy after 3 minutes. It should should begin to start bubbling after one minute. If you want your pitas to be crispy and brown you can bake them for an additional 3 to 5 minutes, but it isn’t necessary.
And there you have it...fresh, warm, fluffy pita bread.
A plate of finished pita
Or...just drop the temperature to 400F degrees and you have delicious flat bread ;)

Thursday, October 1, 2009

Bread Making with the Boy: Teddy Bear Bread

I remember on cold mornings, when I was younger, my mother would put my clothes in the dryer to warm them up so I would be willing to climb out of my warm bed for school. I also remember those kind of cold mornings she would get up extra early to make homemade blueberry muffins. During the fall and winter weekends, she would make homemade bread so our house would be filled with the delicious aroma and warmth that only baked bread could create.

Now, I am the one who wakes up earlier, as the mornings have gotten colder, to warm my son's clothes up. So we can get our run/walk in earlier. So I can make him a nice hearty, hot breakfast. Living so close to the ocean, we live only a 5 minute drive to the beach or the harbor, the fog is starting to come in earlier and the nights are beginning to get cooler. It is definitely beginning to feel like Fall around here. With the season evidently changing and with renewed memories of my mother's homemade bread; I decided that today I would make bread with my son.

Every Thursday my son has a half day at school and today happens to be a Thursday. I found the cooler weather, his half day, and my nostalgia as signs that today was a perfect day to make bread. Not just any bread though, no, today we made Teddy Bear Bread. I made the sweet dough while he was in school so it would be proofed and ready to go when he got home. It was great being able to show him how to knead and roll the dough into shapes. Seeing his pride when the bread came out was so fulfilling. I cannot wait to make something else with him.
Making Teddy Bear Bread with my son
TEDDY BEAR BREAD "SWEET DOUGH" RECIPE

(Makes enough dough for: 4 mini teddy bear heads and 1 large teddy bear loaf)
  • 1 1/2 cups lukewarm water
  • 2 tbsp of rapid rise yeast (about two packets)
  • 1/2 cup instant non-fat dry milk
  • 1/2 cup sugar
  • 4 to 5 cups flour
  • 1/2 cup vegetable oil
  • 3 eggs
  • 2 tsp salt
SWEET DOUGH GLAZE (optional)
  • 1 tbsp agave nectar or honey
  • 1 tbsp sugar
  • 2 tbsp milk
Mix all of these ingredients in a small bowl. Put aside to brush on until the bread is almost done baking.
  1. In large bowl of a mixer with a paddle attachment, place the water, yeast, powdered milk, and sugar; mix well until yeast is dissolved.
  2. Add 2 cups flour and beat well until smooth.
  3. Mix in the oil and eggs, beat until smooth, then add the salt.
  4. At this point it the dough will be getting a bit more stiff and stick so change to the dough hook attachment. Then add enough more flour to make a very soft dough.
  5. Knead until smooth and elastic, about 10 minutes.
  6. Transfer the dough to a greased bowl.
  7. Cover loosely with a damp towel, or a sheet of plastic wrap (which I often do) and let rise until doubled.
  8. Punch the dough down, transfer to a floured surface and shape.
  9. Bake at 350F degrees until golden brown. The time will vary depending on how big your bread is, but for smaller rolls, about 20-25 minutes; and for larger loaves, about 40-45 minutes.
  10. If you are using the sweet glaze for your loaves/rolls, about 5 minutes before they are done (when they are beginning to turn golden), take them out of the oven and brush on glaze. Return to the oven for the duration of cooking time.
He was so proud of his Teddy Bear Bread that he is taking one of the mini bear rolls to his teacher tomorrow. The big one...is all his.
The finished Teddy Bear Bread

Tuesday, September 29, 2009

This Granola Bar is Popping!

There are times that I find myself pretty much out of ideas for what to serve my son for his afternoon snack or lunchtime treat. I have to admit, sometimes this makes me feel like a failure at being a mom. When I was younger I assumed I would be queen of the PTA, that I would always have the coolest dinner/dessert/art ideas just come to me out of nowhere, that my son and his friends would think I am cool...While I am a member of the PTA and help whenever I can, I am far from queen (those ladies can be catty...yikes!). I try to always be creative and fun, but sometimes my ideas do not always go according to plan and my OCD/Quest for Perfection does not appreciate that. And for right now, my son thinks I am cool. There are days that nothing goes the way I had envisioned it and there are days like today...today I was the mom I envisioned myself to be and came up with a creative way to incorporate some of my son's favorite snacks into the ultimate snack bar.

I present to you: Peanut Butter Popcorn Granola Bars
Peanut Butter Popcorn Granola Bars
It is not only great for an on-the-go kid, or mother, but unlike some store bought granola bars, you know exactly what you are feeding them.


PEANUT BUTTER POPCORN GRANOLA BARS

(Makes about 9 3-inch bars)
  • 1/2 cup agave nectar (honey can be substituted)
  • 2/3 cup natural peanut butter
  • 1 cup granola
  • 1 cup trail mix
  • 3 cups popped popcorn
  1. Line an 8 or 9-inch square baking pan with foil. Spray foil lightly with cooking spray; set aside.
  2. Heat agave nectar in a large saucepan until boiling. Stir in peanut butter until well blended.
  3. Remove pan from heat and stir in granola, trail mix and popcorn until coated.
  4. Press mixture evenly into prepared pan using either a greased spatula or another piece of greased foil. Refrigerate until cool; cut into bars to serve.

Monday, September 28, 2009

Manly Meal: Macaroni and Cheese Beer-ger Soup

Two nights a week I find myself rather short on time given that I am taking Cardiovascular Technology classes. On those nights, I need something that either can be put into a slow cooker and forgotten about, or is quick and easy to make. Today, I was busy trying to develop new recipes for fall inspired baked goods; so I needed to make something rather quickly. I also want to make sure that even though the meal was thrown together quickly, it was hearty and filling enough for my boys.

My boys love "manly" meals. What our family considers manly meals are ones that are hearty and full of meat. You know, food that men love. Our son loves being able to bond with his dad over their love for meat and cheese. And I...while I enjoy both meat and cheese, I do not quite share their deep rooted love, but I do love making them meals they love.

That was my inspiration for tonight: Macaroni and Cheese Beer-ger Soup.
Macaroni and Cheese Beer-ger Soup
With just a handful of ingredients you get a flavorful and filling soup that the most manly of men and daintiest of women will both enjoy.

MACARONI AND CHEESE BEER-GER SOUP

(Makes 6 hearty servings)
  • 1 (16oz) package of macaroni (I like to use rice macaroni)
  • 2 lbs ground sirloin
  • 1/2 cup carrot, diced
  • 1/2 cup onion, diced
  • 1/2 cup celery, diced
  • 2 tsp garlic, minced
  • 3 tbsp vegetable oil
  • 3 tbsp flour
  • 2 (12 oz) cans beer
  • 1 1/4 cups water
  • 2 1/2 cups chicken broth
  • 2/3 cup milk
  • 1/2 cup sour cream
  • 12 oz American cheese
  • 1/2 cup cheddar cheese , shredded
  • salt and pepper, to taste
  • hot sauce, optional
  1. Before you start on your soup base, get a big pot of salted water boiling. Once it has come to a rolling boil, add your macaroni. Cook your macaroni until al dente, or slightly chewy in the middle. Drain, rinse, and reserve for a little later on.
  2. Saute carrots, onion, celery and garlic in vegetable oil until tender. Whisk flour into sauteed vegetables and allow to cook for 1 minute while whisking constantly. You do not want your soup tasting of raw flour.
  3. Add beer to vegetable/flour mixture and whisk until all the flour has dissolved into beer. Add water, chicken broth and milk. Bring to a light simmer. Turn down burner and allow to simmer for 15 minutes.
  4. While the soup base is simmering, in a separate pan, brown and drain your ground sirloin.
  5. Add sour cream and American cheese. Stir until well incorporated. Also add your macaroni and browned ground sirloin.
  6. Add remaining cheese and stir until all the cheese has melted and been incorporated. Season with salt, pepper, and hot sauce (if using).
I hope you enjoy your manly meal. Happy cooking!

Thursday, September 24, 2009

Homemade Marshmallows...Enough Said.

Marshmallows.

When I think marshmallows, I think JetPuff. When I think JetPuff, I think of s'mores. When I think s'mores, I remember a time when I was five and decided to roast a bunch of marshmallows at once and put them on the bench beside me, so I would not have to keep stopping in between s'mores to make some more. Needless to say, the idea ended up going horribly awry. I ended up with a butt full of marshmallows, instead of a belly full (I accidentally sat on them). Back to marshmallows, yes marshmallows...I have always had an affinity for those little. white puffs of spongy goodness. There has always been something inexplicably strange, yet satisfying, to put one in your mouth; to feel it melt and squish across your tongue. Although, I was never fond of the powdery feeling you would feel in the inside of your cheeks when you had had too many.

The whole making my own marshmallows came about when, couple of days ago, I tried my hand at making whoopie pies for the first time. I had never had one before, but I wanted to try something different. Something that my kitchen has never seen before, or my family for that matter. Although I love cupcakes and they will always have a special place in my heart, kitchen, and stomach, I felt it was time for a change. Anyways, I know that whoopie pies usually have a marshmallow fluff based frosting, however, my whoopie pies were marshmallow fluff-free. Partially because that is not a usual staple in our pantries and partially because I had decided to make them spur-of-the-moment. I ended up using a "no-cook" version of 7 Minute Frosting (it is really a great, fluffy frosting I will have to put up one day). Everyone in the house loved the whoopie pies and suddenly I was thinking of creating new whoopie pie flavor combinations, which made me start thinking of marshmallows. Although 7 Minute Frosting tastes great sandwiched in a whoopie pie, I wanted a little more substance.

Sure, I could just go out and buy some marshmallow fluff, but I do not do store bought. Ok...sometimes I do do store bought, but I try to avoid if I can make it. I have seen many food magazines and blogs try their hand at making marshmallows, but I tried to avoid making them at all costs. I am not sure why. Perhaps it was reading the fact that a candy thermometer is often required, I know how to use one, but I am not a fan. Perhaps it was reading stories about marshmallow making going horribly awry. Either way, I have voiced my avoidance of making my own marshmallows to my husband on several occasions, the most recent being last week. And then this morning I announced to my husband, "Today, I am making marshmallows!"

I smiled and waited for him to respond. And he did.

"What happened to you saying you would NEVER make your own marshmallows because it was too messy and too much trouble?"

To which I responded like I always do when I change my mind, which is quite often. I just smiled my sheepish smile.

And do you know what? I am so unbelievably happy that I changed my mind. The marshmallows were not hard to make and they came out amazing! Everyone who has ever made, or tried a homemade, marshmallow is right, once you have had a REAL marshmallow, you never will go back to store bought marshmallows again.
Homemade Vanilla Marshmallows
JetPuff? JetPuff who? I am already dreaming up new flavors to try...

HOMEMADE VANILLA MARSHMALLOW RECIPE

(Makes about 90 (2 x 2) marshmallows. Recipe halves quite nicely.)
  • 4 tbsp gelatin (equals about 4 packets)
  • 3/4 cup water
  • 1 tbsp vanilla
  • 3 cups sugar
  • 1 1/4 cup light corn syrup
  • 3/4 cup water
  • 1/2 tsp salt
  • powdered sugar and rice flour (cornstarch may be substituted)
  1. Line an 11 x 15 baking pan with parchment or wax paper. If you do not have this size baking pan, you could use a 9 x 13 pan and a loaf pan for the excess. Coat the paper with vegetable oil or non-stick spray. At this time, also fit your mixer with the whisk attachment.
  2. Mix the vanilla extract and 3/4 cup of water in the bowl of a stand mixer and sprinkle the gelatin over to soften (also called blooming) for about 10 minutes.
  3. Put the sugar, corn syrup, remaining 3/4 cup water and salt in a heavy saucepan. Cover and bring to a boil. Once it comes to a boil, uncover and continue boiling until it reaches the soft-ball stage (234-240 F). I said before that I do not like using candy thermometers, so soft-ball stage would mean that if you dripped some of the hot sugar into ice cold water, it would form a ball. However, if you were to pick up the ball of sugar from the water it would still be malleable. This is how I tested when my sugar was done. Cooking sugar can be a temperamental process and temperatures can change quickly; so watch your sugar carefully. Also, remember this is hot sugar so please, BE CAREFUL.
  4. With the mixer at medium speed, pour all of the hot syrup slowly down the side of the bowl. Use great care as the mixture is very liquid and hot at this point and some may splash out of the bowl ; use a splash guard if you have one. After the mixture has started to come together, turn up the speed to high and whip until the mixture is very fluffy and stiff (about 8-10 minutes). You will notice at this point your mixture will grow quite a bit. Mine almost came to the top of my KitchenAid mixer's bowl.
  5. Pour mixture into the prepared pan and smooth with an oiled offset spatula so that it is level with the top of the rim (it should not completely fill the pan). Allow the mixture to sit, uncovered at room temperature until set and not that sticky. Most recipes will say 10-12 hours, even overnight. I found mine set in about 4 hours. However, it really depends on how thickly you poured your marshmallow and the weather. If it is really hot, you may find it difficult to make your marshmallow set.
  6. When the marshmallow is set, mix equal parts powdered sugar and rice flour and sift generously over the rested marshmallow slab. A lot of recipes I found use just powedered sugar, I think that it would be far too sweet and deter from the smooth, creamy, light flavor. I had read somewhere that some chefs use rice flour or potato starch since both are flavorless and coat the marshmallows without clumping.
  7. After you have liberally sifted the powder mixture onto the marshmallow slab, turn it out onto a cutting board, or counter, peel off the paper and dust with more powder mixture. Slice with an oiled chef's knife, oiled cookie cutters, or clean, oiled kitchen scissors. Dip all cut edges in powder mixture and shake off excess. Marshmallows will keep about three weeks at room temp in an air-tight container. If they last that long...