Aside from all the things aforementioned, there is a certain happiness I get just from looking at the cute little cakes with their adorable frosting and attire (ie: cupcake liners). However, aside from frosting and liners, often the cupcake itself can look rather boring, neglecting filled cupcakes that is (which will be a whole other post soon).
Enter "After the Rain" or rainbow cupcake...
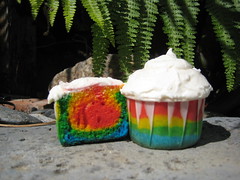
Just one look at this pretty little thing and you cannot help, but smile and feel a little warmth spread in your heart. Now these little beauties are great because the colors can be altered to suit whatever you or the recipient like. My son loved these because they were colorful and suited his need for a "cool cupcake" to pass out to the counselors at his summer program on his last day there. His only request...no purple, despite the fact that half the counselors were girls. Go figure...hahaha.
One of the things I enjoy about this bit of colorful delight, besides that it is not too sweet so you can go wild with frosting, is the fact that it looks way more complicated than it truly is. Yes, it takes more time to assemble than a single flavor cupcake, but the ooohhhs and aaahhhhs you will receive when you present them will definitely be worth the effort.
AFTER THE RAIN CUPCAKES:
(Recipe adapted from Baking Bites. Makes about 10-12 cupcakes.)
- 1 cup all purpose flour
- 1 1/2 tsp baking powder
- 1/4 tsp salt
- 1/2 cup sugar
- 2 large eggs
- 1/2 cup vegetable oil
- 1/2 cup buttermilk
- 1 tsp vanilla extract (I will sometimes add a 1/2 tsp of almond extract as well)
- red, yellow, green and blue food colorings (I prefer to use coloring gel)
- Grease 10 cups from a 12 cup muffin tin or line with paper cups. I prefer white paper cups so the colors show through ;)
- In a medium bowl, whisk together flour, baking powder and salt.
- In a large bowl, whisk together sugar, eggs, vegetable oil, buttermilk and vanilla extract.
- Pour in dry ingredients and stir until just combined.
- Divide batter evenly into 5 small bowls; each should have a little more than 1/3 cup batter (approx 6 tbsp or so for each).
- Add about 1/2 tsp food coloring, or a good blob of coloring gel on a toothpick, to each bowl to make red, orange, yellow, green and blue batters. Stir well, so no streaks of plain batter remain. Add additional food coloring if necessary.
- Starting with the blue batter, add a small spoonful to each of the 10 grease muffin cups (just over 1/2 tbsp in each). Repeat with all remaining colors, working from green to yellow to orange to red, adding each subsequent spoonful on top of the previous color**
- Bake for about 15 minutes, until a toothpick inserted into the center comes out clean.
- Cool cupcakes on a wire rack before frosting.
The Shy Gnome wanted his picture taken, but got too shy to show his face in the end...if you look closely though you will see that he tried to sneak a taste of the frosting...


Dude those look fucking sick. Brittany and I are going to have to try making these bad boys soon- but with whole wheat flour!
ReplyDeleteHahaha...you could totally use wheat flour. But if I were you, I would just use unbleached regular flour. It wouldn't mess with the color or texture as much, but would be healthier than white flour.
ReplyDeleteWelcome to the blogging world. Having fun yet? Rainbow cupcakes are the best! As a kid, I would've died to have them for my birthday, or any day :)
ReplyDeleteThank you for the warm welcome Dorothy :)
ReplyDelete