Saturday, August 29, 2009

The Family That Cooks Together...Stays Together

Today my parents and my husband's family all got together for dinner. We all usually see each other at least once a month for an evening of catching up and food. I believe there is nothing greater than everyone bonding over food. If anything, it is the universal bond between us all. We may not all enjoy the same types of food, but we all can agree that we enjoy it.

As I am now a wife and mother, I enjoy cooking for my family and friends. It gives me an immense amount of pride and undeniable joy that I can nourish their bodies with my cooking and minds with conversation around my dining table. To me, there is nothing better.
Family Dinner
My husband enlisted in the Navy a couple months ago and is on delayed entry because of the overwhelming amount of new recruits, so he will not be leaving for boot camp and A-training until February of next year. We will not know where we will be stationed until after he returns, though it seems fairly certain we will not be staying in San Diego. It is somewhat exciting, but scary at the same time because our families have never been far and neither of us have lived outside of San Diego. Knowing that we more than likely not be staying here has made me think of what I might be leaving behind: my family's cooking.

I come from a family that has always centered around the kitchen. Both of my parents cook, my grandparents cooked, my aunts and uncles cook. I am of Chinese, Korean, and Italian decent so there has always been an abundance of different cuisines rotating through my family's kitchen for as long as I can remember. Before I continue, let me say...I am an odd Asian girl...I do not really prefer rice as much as I prefer pasta. When I was younger I used to get very burnt out on Asian food, but now that I have a family and house of my own, I find that sometimes I crave it. My mother, her mother, and her sisters have always made amazing Korean food. My father and his mother have always made amazing Chinese food. And me...well...I never made a good, let alone amazing, dish from either cuisine until today...

I had never really thought about learning to cook either Chinese or Korean food because I have always had my parents/grandparents around to make it for me if I desired. However, a few years ago my grandmother on my father's side passed away from cancer and suddenly a lot of the Chinese food I had grown accustomed to was no longer around. Sure I could go to a restaurant, but it was not the same. It was not my grandmother's. I think about a year ago my father was going through what I am going through now...trying to learn the family's recipes so you could still have a taste of what once was. My father started noticing all the things that my grandmother used to cook that he had never really took the time to learn to make himself that now was not there. So he took to trying to go through her old handwritten notes of what recipes she did write down (highly embellished and personally flourished as most Asian cooks usually do) and scouring the internet for the ones he could not find. I suddenly realized a couple weeks ago that if/when we move there might come a day where I would want some of my parents' cooking and they would not be around to make it for me. I needed to learn. Not only for myself, but for my family. So we all could retain the closeness that food brings, whether we are just down the street from one another or across the ocean.

I decided to keep what was on the menu a secret until the last moment. I wanted to surprise them by honoring my heritage with tonight's meal. I was actually quite nervous about this turning out well as I have never really cooked any Korean or Chinese food on my own. So today I spent the afternoon marinating, chopping, prepping, and cooking. I decided I would use my mother's Korean bulgogi sauce that she showed me how to make last weekend (recipe soon) on some chicken, some more chicken with a spicy Korean BBQ sauce made with gochujang (a savory and pungent fermented soybean paste) that my mother introduced me to and that my American husband loves, a Chinese Pan-Fried Noodle dish (recipe included) similar to the Chinese dumpling place my father introduced me to and that he sometimes makes at home, and, of course, steamed rice. It actually turned out pretty good.
I made Chinese and Korean Food!
My parents both were pleased with my first attempt as well as the rest of my family. I am so happy with how things turned out and am not longer as intimidated with venturing into Asian cooking. Actually, I ready to try my hand at some more of their recipes soon.

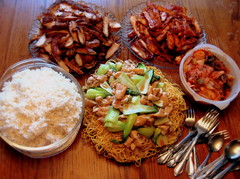
But for now...we will start with this...

CHINESE PAN-FRIED NOODLES

(Serves about 6-8 hungry people)
  • 1 (14oz) pkg. Oriental Lo Mein Style noodles
  • 2 boneless, skinless chicken breasts, thinly sliced
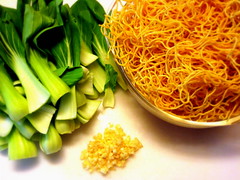
  • 2 stalks of bok choy or 4 stalks of baby bok choy
  • 4-5 cloves of garlic, minced
Marinade:
  • 1 tsp of sesame oil
  • 1 tsp of ground white pepper
  • 1 tsp of rice vinegar
  • 1 tsp of corn starch
  • 1 tsp of light soy sauce
  • 1 tsp of oyster sauce
Sauce:
  • 1 tbsp of oyster sauce
  • 1 tbsp of soy sauce
  • 1/4 cup chicken broth
  • 3/4 cup water
  • 1 tsp of sugar
  • 1 tsp of cooking wine
  • 1/4 tsp salt
  • slurry (1 tbsp corn starch dissolved in 2tbsp of water)
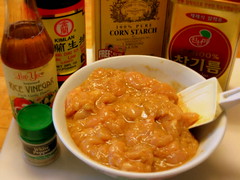
  1. Use a small mixing bowl, add chicken slices and the ingredients for the marinade. Allow the chicken to marinate for at least 20 minutes, though I left it for a couple hours in the fridge.More ingredients for Chinese Pan-Fried Noodles
  2. After the chicken is through marinating, set the stove to high. Add 2 tblsp of cooking oil to a wok/pan. Wait until the oil gets hot and add the chicken. Cook the chicken until no longer pink, about 3 minutes. Remove from pan.
  3. Cut the bottoms off of the bok choy. There could be sand trapped in between the leaves so be sure to wash and drain them. Use a small pot, fill it with shallow water and set to boil. Lightly blanch the bok choy and drain. This will save some time when preparing the final dish. At this time, you might also want to blanch your noodles for about a minute, so you will not get a "raw" taste to the noodles.Ingredients for Chinese Pan-Fried Noodles
  4. Starting with a clean wok/pan, again, set stove to high. Add a generous amount of cooking oil, about 3 to 4 tbsp. Once the oil starts fuming, but not smoking, put the noodles in. The noodles should brown very quickly. Using a pair of chopsticks, or the spatula, to make sure the noodles are getting browned evenly. If you need to, use the spatula to press the noodles agains the pan or add some more cooking oil to make sure at least you brown most of the noodles.
  5. Flip the noodles and pan-fry the other side. Make sure the noodles are getting browned evenly. Remove the noodles and set them on the serving plate.
  6. After removing the noodles, add 2 tblsp of cooking oil in the pan. Maintain the stove setting at high. Wait until oil starts fuming. Quickly add minced garlic, salt, and cooking wine. Stir well.
  7. Add chicken broth, water, oyster sauce, soy sauce, and sugar. Stir well.
  8. Continue stirring until the mixture starts boiling. Add the slurry to thicken the sauce until you obtain the right consistency. Not too thick, not too runny.
  9. Re-add the chicken and vegetables into the pan. Cook for 2 to 3 minutes. Keep stirring.
  10. When finished, pour the mixture onto the noodles. The essence of this dish is to let the boiling hot sauce moisten and soften up the dry pan-fried noodles when served.**
**NOTE** If you prefer other types of meat, this dish is great with beef, shrimp, BBQ pork, and pork slices.

Enjoy!

Friday, August 28, 2009

Mini Wedding Cakes and Second Degree Burns

Today is only about halfway over and I have already had enough. I am currently typing with only seven of my ten fingers(one cannot be used simply because of the fingers that were injured).

Why?

Second degree burns. More on that later...

About a week ago my darling friend Valancy Jane asked if I could make a mini wedding cake for her darling friend, Bride 1.0. You see, Bride 1.0 and her fiance, Groom 1.0, are planning a bigger wedding later this year, but were craving something more intimate first. Enter Bride 1.0's surprise for her adventerous, but unknowing, fiance...a surprise wedding. Tomorrow. In a hot air balloon.

Yes, she is a daring young lady.

On top of that, my darling Valancy Jane has become ordained online and will be performing the wedding tomorrow, in handmade clergywear nonetheless. After Valancy had divulged all of this, and after having brief email correspondence with Bride 1.0, I was ready to tackle the mission given. The only guideline I was given: no chocolate.

Having lately dedicated my time to cupcakes and french macarons (not macaroons), I thought I should do a tester mini wedding cake before going headfirst into the real deal. Here is what I came up with:
My first mini wedding cake
An almond brown sugar cake filled with italian buttercream and lemon curd topped with more italian buttercream and marshmallow fondant roses brushed with edible glitter.

It was nice. Simple. Yummy. I was ready for the real deal.

But since I am me: a classic Asian perfectionist and all-around overachiever, I could not leave nice, simple, and yummy alone. I wanted more. I wanted something as grandiose as this wedding was going to be.

My plan of action: a two tier mini cake filled with lemon curd, the bottom layer a simple covering of brown sugar swiss meringue buttercream, the top layer covered in marshmallow fondant (Bride 1.0 likes fondant, Groom 1.0 not really a fan) with decorations made out of marshmallow fondant and gum paste. Note: I am still rather green when it comes to working with gum paste and marshmallow fondant, but given my artsy background I had a feeling I would love it. And I do.

In my mind I had a vision of what I wanted the top tier to look like, I even sketched it out and everything. It was going to be a top layer that looked like a hot air balloon basket with two lovebirds inside, a banner with their names on it, and a 3D hot air balloon. I started modeling and painting my figures several days ago, as I knew it would take a while for them to dry. Then I covered the top layer in fondant and assembled the banner and birds like I had invisioned...
Topper for Bride and Groom 1.0's Mini Wedding Cake
...the only thing I had left to figure out was the 3D hot air balloon.

I had been fretting and trying out things daily, growing more anxious as the big day grew closer. Last night, my husband told me that I should just leave well enough alone and take the two tier mini wedding cake to Valancy today...sans the 3D hot air balloon. While I agreed that the cake looked rather lovely without the hot air balloon, I wanted the hot air balloon. I NEEDED the hot air balloon.

So while my family had gone to bed, I stayed up trying to figure out how to make my 3D balloon a reality. Finally, at 6am this morning, I had come up with my plan. I put the plan into action and it seemed to be working, but once I went to heat some more sugar that is when things went horribly wrong...I blame it on my impatience, on my tendency to dive into things headfirst, and my desire to be extremely detailed and beyond expectation. Whatever the reason, when I went to go get the hot sugar I got some of it onto my right middle and ring finger. OUCH!

It actually took a few seconds of my fingers burning to realize I was burning. I immediately put my emergency medicine background into use and submerged my burnt fingers into icy water, but as many of you have worked with sugar know, hot sugar keeps on burning, even after it has been removed...painful! I could see white blisters emerging as soon as I took them out of the icy water. After I popped a few rapid release Tylenol and my darling husband had assisted me in wrapping my fingers...
Molten Sugar+Bare Hand=2nd degree burns
I went back to work...but with one disappointing reality, the 3D hot air balloon was not going to happen.

I had to work quickly to cover the area I had opened up on the top of the cake to place the hot air balloon. My new plan...a few more handmade red roses (Bride 1.0 had mentioned during one of our correspondences something about red roses). The cake was saved and was finished in time to take to Valancy before she heads up to see Bride 1.0.
Bride and Groom 1.0's Mini Wedding Cake
Lesson of the day: sometimes it is okay to be simple. To be plain. To just be yummy.

But it does not mean I will not try to be grand next time...

Thursday, August 27, 2009

Summer Heat and Creamy Baked Potato Soup

Lately the weather has been extremely hot and humid here in San Diego, even though we live five minutes from the beach, which is thwarting my ventures into marshmallow fondant and making it rather difficult to come up with dinners for my family where I am not slaving in a hot kitchen.

So what did I decide to cook for my boys today?

Creamy Baked Potato Soup.

Yes, you read right. Creamy Baked Potato Soup.

While the weather has been borderline unbearable, there are two things my family and I cannot deny: filling, flavorful soups and potatoes. I also found that, with this soup, I was able to make something we all could enjoy after going to the gym and limit my time in the kitchen.

The first thing you need is baked potatoes.
How to bake potatoes quickly and evenly
In this photo you probably noticed that not only are my potatoes wrapped in foil, but they are also on a metal skewer. It is something I learned from watching Nigella Lawson's Food Network show "Nigella Feasts." She says that it makes the potatoes cook faster and evenly. And you know what? It works.

Then you will need just a couple more things:
Ingredients for Creamy Baked Potato Soup
milk (we like skim milk in our house), chicken broth, bacon (or salt pork, sometimes I use a mix of both), finely diced onion, sour cream, and selection of spices.

Many baked potato soups ask for a lot of butter and flour, but I find that the starches in the potato, along with the addition of chicken broth, makes the soup rich enough. However, depending on how creamy you and your family like it a little slurry goes a long way...

CREAMY BAKED POTATO SOUP

(Serves 6 to 8)
  • 12 slices bacon (or like today: 6 slices of peppered bacon and a 3-in block of salt pork)
  • 4 cups milk
  • 3 cups chicken broth
  • 4 large (8 smallish medium) baked potatoes, peeled and cubed
  • 1/2 small onion, finely diced
  • 1/2 cup sour cream
  • 1 teaspoon salt (omit if using salt pork)
  • 1 1/2 teaspoon freshly cracked black pepper
  • 1 teaspoon rosemary
  • 1 1/2 teaspoon Italian seasoning
  • 1/2 cup cheddar cheese, shredded (optional)
  • slurry {2 tablespoons cornstarch mixed with 4 tablespoons water}, (optional)
  1. Place bacon/salt pork in a large, deep skillet. Cook over medium heat until slightly browned and most of the fat has been rendered. Drain, crumble, and set aside.
  2. Drain half of the fat that was rendered, leaving the other half in the pan. Add the finely diced onion and saute until almost translucent. Add back the bacon/salt pork and the seasoning. Cook until the onion is softened and the seasoning has become fragrant.Cooking down the bacon, onions, and seasoning
  3. Gradually stir in milk and chicken broth. Once it starts to simmer, stir in potatoes. Bring to a boil, stirring frequently. At this point, if you would like a thicker soup, add the slurry and stir. Bringing it up to a boil
  4. Reduce heat, and simmer 10 minutes. Mix in the cheese, if you are including it, and the sour cream. Continue cooking, stirring frequently, until cheese is melted.
And then...it is done...Creamy Baked Potato Soup for a hot summer night.
Creamy Baked Potato Soup
Enjoy!

Tuesday, August 25, 2009

Cupcake Chronicles: After the Rain with a cameo by The Shy Gnome

I have said it before, but I will say it again...I love cupcakes!

Aside from all the things aforementioned, there is a certain happiness I get just from looking at the cute little cakes with their adorable frosting and attire (ie: cupcake liners). However, aside from frosting and liners, often the cupcake itself can look rather boring, neglecting filled cupcakes that is (which will be a whole other post soon).

Enter "After the Rain" or rainbow cupcake...

After The Rain

Just one look at this pretty little thing and you cannot help, but smile and feel a little warmth spread in your heart. Now these little beauties are great because the colors can be altered to suit whatever you or the recipient like. My son loved these because they were colorful and suited his need for a "cool cupcake" to pass out to the counselors at his summer program on his last day there. His only request...no purple, despite the fact that half the counselors were girls. Go figure...hahaha.

One of the things I enjoy about this bit of colorful delight, besides that it is not too sweet so you can go wild with frosting, is the fact that it looks way more complicated than it truly is. Yes, it takes more time to assemble than a single flavor cupcake, but the ooohhhs and aaahhhhs you will receive when you present them will definitely be worth the effort.

AFTER THE RAIN CUPCAKES:

(Recipe adapted from Baking Bites. Makes about 10-12 cupcakes.)
  • 1 cup all purpose flour
  • 1 1/2 tsp baking powder
  • 1/4 tsp salt
  • 1/2 cup sugar
  • 2 large eggs
  • 1/2 cup vegetable oil
  • 1/2 cup buttermilk
  • 1 tsp vanilla extract (I will sometimes add a 1/2 tsp of almond extract as well)
  • red, yellow, green and blue food colorings (I prefer to use coloring gel)
  1. Grease 10 cups from a 12 cup muffin tin or line with paper cups. I prefer white paper cups so the colors show through ;)
  2. In a medium bowl, whisk together flour, baking powder and salt.
  3. In a large bowl, whisk together sugar, eggs, vegetable oil, buttermilk and vanilla extract.
  4. Pour in dry ingredients and stir until just combined.
  5. Divide batter evenly into 5 small bowls; each should have a little more than 1/3 cup batter (approx 6 tbsp or so for each).
  6. Add about 1/2 tsp food coloring, or a good blob of coloring gel on a toothpick, to each bowl to make red, orange, yellow, green and blue batters. Stir well, so no streaks of plain batter remain. Add additional food coloring if necessary.
  7. Starting with the blue batter, add a small spoonful to each of the 10 grease muffin cups (just over 1/2 tbsp in each). Repeat with all remaining colors, working from green to yellow to orange to red, adding each subsequent spoonful on top of the previous color**
  8. Bake for about 15 minutes, until a toothpick inserted into the center comes out clean.
  9. Cool cupcakes on a wire rack before frosting.
**Please** Do not attempt to spread the layers of color out; this will cause the colors to combine and make a swirled mess. Just allow them to spread on their own, believe me, they will.

The Shy Gnome wanted his picture taken, but got too shy to show his face in the end...if you look closely though you will see that he tried to sneak a taste of the frosting...
After The Rain and The Shy Gnome

Thursday, August 20, 2009

When life gives you lemons...

...make curd; is what I say.

Homemade Low-Fat Lemon Curd 2 Homemade Low-Fat Lemon Curd
There are few things that I feel epitomize summer like a bright, tangy lemon curd. Perhaps it is the sunny yellow that makes me think summer and feel so happy. Or the cool tang it possess when it hits your lips, be it on a scone or the center of a luscious cupcake, like a glass of lemonade from some kids on your nearby corner. And while this lemon curd might take more time than it takes to fish a quarter out of your pocket, it is far less sugary and very much worth the extra time.

I find that lemon curd, especially this one, tastes so good that it is very difficult to stop at only a few bites. Unfortunately, the richness of lemon curd, or any curd for that matter, primarily comes from fat, most often butter, and although the zest of the lemon makes the curd taste lighter, most versions are far from healthy fare. Is it not always our luck that the most tasty things are the ones we should not be overindulging in? Luckily, this recipe calls only for eggs, so not only do you get the same sweet and tart flavor of the common lemon curds, this one is lower in fat. Which we all can consider a bonus during these bikini months.

I found this recipe while perusing Nicole Weston's blog Baking Bites, which I absolutely love by the way, I saw that she had a go-to recipe for lemon curd that she had acquired from Chocolate and the Art of Low Fat Desserts by Alice Medrich. If you have one or two lemons on hand, this is the perfect brunch accompaniment or light dessert topping.

LOW-FAT LEMON CURD

(Recipe from Chocolate and the Art of Low Fat Desserts. Makes about 2/3 cup)

  • 1/3 cup strained, fresh lemon juice
  • 2 tsp fresh lemon zest ( I like mine very tangy, so I include the zest from the entire amount of lemons used)
  • 5 tbsp sugar
  • 1 large egg, room temperature
  • 1/2 tsp vanilla extract

  1. In a small sauce pan, over medium heat, combine sugar and lemon juice. Add zest and stir until sugar is dissolved completely.

  2. In a medium bowl, lightly beat egg.
  3. Whisking constantly (or with an electric mixer on low), very slowly stream the hot lemon-sugar syrup into the egg. Beat for 2 minutes (only 1 if you’re using a mixer), then transfer back into the saucepan by pouring the mixture through a sieve.

  4. Cook over low heat, stirring constantly, until the curd just comes to a boil.

  5. Remove from heat and stir in vanilla.

  6. Transfer to a small airtight container and store in the fridge.

    Makes about 2/3 cup. Recipe can be doubled.

Saturday, August 15, 2009

Cupcake Chronicles: Plain Jane

I have always loved cupcakes.

Like most children, I always looked forward to my birthday in school. Not because I usually got it off since it falls near a national holiday, no...because my parents always used to make me from-scratch cupcakes to share with the class. Honestly, I did not even know cake came from a box until I went to a sleepover when I was nine-years-old. I suppose that might be why I love them even more now than I once did...because I remember not only the taste of the batter licked from the bowls, but the love that went into them. Now, as a mother, I strive to ensure my son has the same experience and love of all things made from scratch.

I believe another reason I love them so much is because cupcakes have such potential to create as simple, or complex, a flavor as your heart desires. And while I plan on chronicling all the different flavors I come across and attempt, I want to start with a classic: Plain Jane.
Plain Jane
While in the kitchen earlier this week, experimenting with a new possible cupcake flavor combination, my husband suggested I make the tried and true: vanilla. I always have, and will be, a chocolate girl myself, but I had to admit he was right about making one. Even though I might always choose chocolate over vanilla, there were those that would not and I need to appeal to all palates. I am so glad I listened to him.

There is something about this vanilla cake that I enjoy. It is reminiscent of childhood, when the only choices you had for cake seemed to be chocolate or vanilla, it is familiar, safe. However, do not think that this cupcake is anything, but plain...it has subtle hints of vanilla, almond, brown sugar, and butter(though this recipe contains none). Since it has such round flavors, it could be paired with virtually any frosting flavor, though for this particular one I used vanilla swiss meringue butter cream. They are sure to please a crowd; whether they be chocolate or vanilla fans.

PLAIN JANE CUPCAKES:

(Recipe adapted from Cupcake Bakeshop. Makes about 12 cupcakes)

  • 3/4 cup vegetable oil
  • 3/8 cup light brown sugar
  • 3/8 cup granulated sugar
  • 2 large eggs, room temperature
  • 1-1/3 cups all-purpose flour
  • 1/2 teaspoon baking powder
  • 1/2 teaspoon baking soda
  • 1/8 teaspoon salt
  • 1/4 cup skim milk
  • 1/4 cup sweetened condensed milk
  • 1 teaspoon vanilla
  • 1 teaspoon almond extract
Preheat oven to 350F degrees.
  1. Beat oil and sugars on high until incorporates, about 30 seconds.
  2. Add eggs one at a time, beat for 30 seconds after each.
  3. Whisk together flour, baking powder, baking soda, and salt in a bowl.
  4. Measure out both the skim milk and sweetened condensed milk in a measuring cup along with the vanilla and almond extract, mix together.
  5. Add about a fourth of the flour to the oil/sugar mixture and beat to combine.
  6. Add about one third the milk/vanilla/almond mixture and beat until combined.
  7. Repeat above, alternating flour and milk and ending with the flour mixture.
  8. Fill cupcake liners 1/2 to 2/3 full (I usually do slightly more than 1/2 full, but less than 2/3 full since these cupcakes tend to rise quite a bit.)
  9. Bake for 20-22 minutes until golden and a toothpick inserted in the center comes out clean.

Friday, August 14, 2009

The road less traveled is paved with Swiss meringue butter cream

Hello and welcome to my blog!

I am so excited to share my love for cupcakes and all the other tasty things out there. I should probably start making my way to the kitchen so you will soon have something to look at and enjoy.